


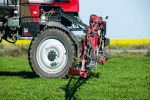


Modified one-way ploughs are a way to re-use existing machinery, and can be a cheap and effective option to tackle soil constraints.
The typical use is to invert soil to bury water-repellent topsoil, with an additional potential effect of raising clay or silt up into the topsoil. Set up differently, they can also be used to mix soil to distribute surface-applied amendments such as lime deeper through the profile and dilute surface water-repellent soil, as well as to break up shallow compaction.
Decide the plough's main use to set it up correctly
Different discs are used for inverting versus mixing, so choose the right disc for the task.
Soil inversion using a modified one-way plough may not be as effective as using a mouldboard plough. However, modified one-way ploughs can still do a good inversion job if the correct discs are used, the plough is set up correctly and paddock conditions are suitable.
The set-up to invert is very specific. Operating faster with inversion discs will give some soil mixing but runs the risk of not inverting well enough or deep enough. You will do a better job if the plough is set up specifically to mix, if mixing is the primary focus required.
A plough set up for soil mixing is more operationally flexible. It can be tweaked to vary the amount and depth of mixing depending on soil texture and conditions. The 760-millimetre discs can mix to 300mm, or a little more if the conditions are suitable. The plough can be set wider when mixing than inverting, so you can cover more ground.
Plough modifications and set-up are situation-specific. Seek advice on setting up the plough correctly for your situation.
Test first
Soil amelioration windows are often narrow and there may not be enough time to do as much as you want. When conditions are good, you should aim to be ploughing rather than setting up the plough.
Test the plough well before you plan on starting amelioration to give yourself time to fix and adjust if necessary. Testing too late and running into problems may push back your start date and reduce the area you can work.
This is also a good time to work out the ‘recipe’ for your paddocks, which consists of how the plough is set up and the best speed. Start slow, check the job by digging with a shovel, adjust the set-up if necessary, then increase speed by about half a kilometre per hour until you are getting the outcome you want. This extra time up-front quickly pays for itself with an effective ploughing job.
Working in the paddock
Soil moisture
Ploughing works better when there is some soil moisture. Mixing can work in drier conditions, but if it is too dry the soil can slide off the discs rather than mix. If it is too wet, the soil can stick to the disc. Soil inversion often works better with moderate, or more, soil moisture levels. Note soil moisture when testing the plough to gauge what moisture level works well or is too wet/dry.
Crop residue
Stubble handling or cutting capabilities are variable and largely depend on the amount of stubble, its moisture content and the hardness of the soil at the time of ploughing. The notched/scalloped disc shape helps chop up some of the stubble. Typically:
- wet/damp stubble is harder to work than dry stubble; and
- stubble on hard or gravel soil is easier to work with than on soft sand or soil.
Combined, this means the plough has a much better stubble handling ability on hard soils with dry stubble than soft sands with damp stubble.
If in doubt, the less residue the better. Too much residue makes it harder for the plough to bury the topsoil properly. If you are ploughing a paddock to ameliorate a severe soil constraint, chances are there will not be much plant residue anyway. If it looks like there will be too much stubble, consider:
- harvesting the paddock as close to the ground as possible;
- grazing the paddock to reduce stubble residues; or
- as a last resort, burning the residue.
Direction
Plan how you are going to work the paddock and be realistic about what you can do.
Two ways to use the plough are working anticlockwise around the paddock (the ‘traditional’ way) or to plough in blocks.
Figure 1 (below) is a scaled-down example of block ploughing. The example paddock has been divided into three small blocks – ordinarily blocks would be 200 to 300 metres wide to minimise the number of closing runs. Starting on guidance line 1, the grower runs up the paddock, skips runs 2 to 6, then heads back down the paddock on line 7. This way the final line, run 4, is heading in the same direction as the first line and the plough is turning left to head to the next block. Any odd number of runs will work for the first block.
Set-up can be different for each block and paddock. Do the maths first, using paddock size and cut width, so that:
- all ploughing is on straight lines;
- you have enough room at the end of each run to turn – at least 30m – remembering the plough needs to be lifted out of the ground before starting to turn;
- you are starting at the right-hand-side of the paddock. If wanting to complete headlands by ploughing a full circle around the paddock (rather than up and back at the two ends of the paddock), start on a run line that will leave a consistent unploughed perimeter the same as the 30m or so paddock end turn zones;
- there are an odd number of lines in the first block in the paddock, so the last line in the block is heading in the same direction as the first line and the plough is turning left to head to the next block. Even numbers will place you at the opposite and wrong end of the paddock when you finish the block;
- the last two runs of each block are ploughed with the rear axle raised (feathering) to avoid leaving a land end (trench) in the middle of the block; and
- there is no or only minor overlap in the last run in each block; for example, runs 4, 11 and 18 in Figure 1. The plough cannot work against itself at normal capacity, so managing the finish needs either GPS offset adjustment of the plough centreline or manipulating the plough cut width GPS setting.
Ploughing in blocks using autosteer requires the plough main hitch to be set up so the plough is stable, and you need to be competent with your autosteer ability. Autosteer can be successfully used in uniformly sandy paddocks, but on variable soil types (for example, where there are gravel ridges) the plough may open and close, so guidance might not always be an option.
Finishing each plough run about 30m or more short of the end of the paddock allows room for lifting, turning and carrying the plough to the next run. When all the individual blocks in the paddock are finished you will have a consistent width at the ends of the paddock or around the outside of the paddock to complete the headlands. If a twin pull plough set is being used, more turning room may be needed, or a slightly different finishing method can be used.

Figure 1: Block ploughing diagram. Source: Ben Plozza, Plozza Plows
When ploughing anticlockwise, one tip is to raise the plough on the corners. This leaves ‘roadways’ into the centre of the paddock (or what was traditionally called ‘headlands’ before up-and-back working). The reason for this is to avoid pulling the plough through worked areas, creating trenches on the corners.
When the plough is towed through soft ploughed ground leaving the paddock or doing headlands, slow right down and take care to avoid bending the axles. This is critical when the plough is raised out of the ground and is towed through soft ploughed soil .
Speed
Typical speeds are 4km/h to 7km/h. Working slower means you will get fewer hectares done, so choose a speed that is doing a good job by constantly monitoring the result. Ploughing too quickly (typically 8km/h or faster) tends to give a poor result. If paddock soil type varies significantly, you might need to change working speed across the paddock.
Slower speeds are necessary if you are trying to invert. Going too quickly results in less inversion and more mixing. For example, if you are working on soft sand and want to maximise inversion, you will need an inversion disc and to operate more slowly than about 6km/h.
Slower speeds are also better if wanting to work deep. Working faster tends to increase soil mixing but reduces the depth. Too fast puts the machine at risk of rock or stump damage. Do not be surprised at how much rock and/or stumps you pull up and will need to remove during and after ploughing.
Post-ploughing
Good paddock management after ploughing is crucial. Land ends (trenches) and holes need to be filled so machinery, especially boomsprays, can safely traverse paddocks. Any implement that can move soil around can be used for smoothing, such as old chisel ploughs, scarifiers, cultivators, speed tiller or prickle chain. Run the smoothing implement at an angle to the plough workings. In good conditions and with a skilled operator the plough can leave a good finish, but there may still be areas that need smoothing.
After smoothing, the paddock needs rolling to make a firm seedbed, unless you have soft soil seeding equipment. Some seeding bars are simply too heavy for softer soils. Rolling and lighter lower-ground-pressure seeders may be required. Do not deep plough until you know you can prepare the seedbed properly. Seeding too deep is the main problem in the first season after ploughing.
If you do not have dedicated soft soil seeding equipment, a roller is recommended. Roll heavily enough that a standard four-wheel-drive ute can be driven on the worked paddock in two-wheel drive. At this point, most seeder bars will be operable.
If you are ploughing opportunistically in summer/early autumn after rain, when seeding is still a while away, leave the paddock surface rough until just before seeding. A rough surface copes better with wind erosion. Duplex and gravelly soils are more likely to leave a clumpy surface than deep sands. Sands are less able to resist wind erosion.
Troubleshooting
Too much wheel slip: incorrect tyre pressure, uneven weight distribution, or tractor not big enough. Traction requirements are high.
Not inverting enough: incorrect discs fitted, plough set-up incorrect, or going too fast.
Inversion discs ‘plugging’ with soil: too wet, more clay than anticipated, or wrong discs.
This article was produced as part of the GRDC ‘Maintain the longevity of soils constraints investments and increase grower adoption through extension – western region’ investment (PLT1909-001SAX). This project is extending practical findings to growers from the five-year Soil Constraints – West suite of projects, conducted by the WA Department of Primary Industries and Regional Development, with GRDC investment.